Shiny & Snappy: Demystifying Chocolate Tempering
Unlock the secrets to perfectly tempered chocolate! Achieve that coveted shine and snap with our expert guide.
Shiny & Snappy: Demystifying Chocolate Tempering for Perfect Confections
Chocolate. The very word conjures images of decadent desserts, comforting treats, and pure indulgence. But behind the smooth, glossy surface of a perfectly crafted chocolate creation lies a crucial process: tempering. Tempering chocolate might seem intimidating, but with a little understanding of the science and some practice, you can achieve professional-quality results at home. This guide will break down the mystery, empowering you to create stunning chocolate delights.
The Science of Chocolate: Crystals and Tempering
To understand tempering, you need to understand chocolate's composition. Chocolate is primarily composed of cocoa butter, which is a fat capable of forming different types of crystals. These crystals are key to chocolate's texture, appearance, and stability.
Untempered chocolate contains unstable crystals that result in a dull, grainy texture and a tendency to melt easily. Tempered chocolate, on the other hand, contains stable beta crystals, which give it a smooth, glossy finish, a satisfying snap, and resistance to blooming (that unsightly white coating).
Tempering is the process of manipulating the cocoa butter crystals to create a predominance of these desirable beta crystals. It involves melting the chocolate, cooling it to encourage the formation of the correct crystals, and then gently warming it back up to a working temperature.
Tempering Methods: Choose Your Weapon
Several methods exist for tempering chocolate, each with its own advantages and disadvantages. Here are three popular approaches:
1. Seeding Method
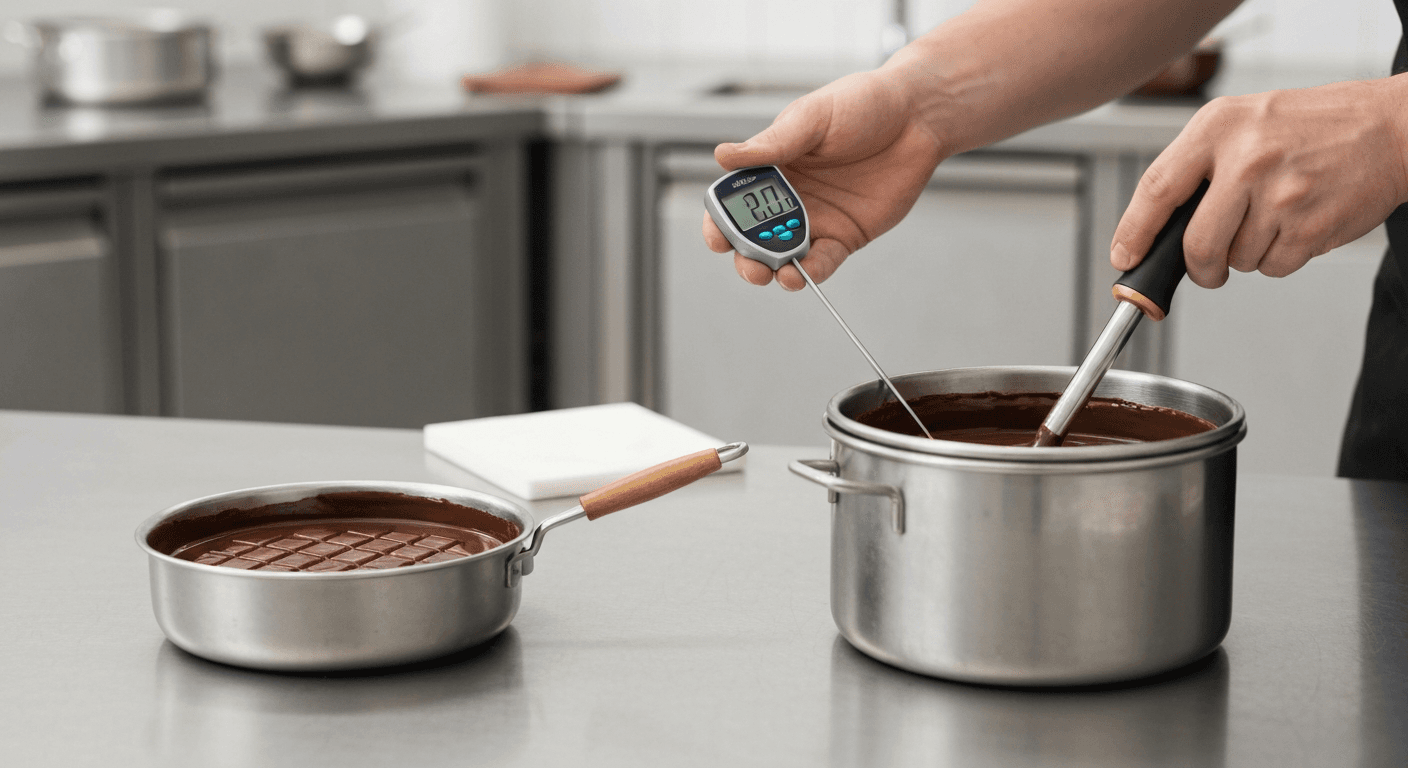
The seeding method is a reliable technique often favored by beginners. It involves melting most of the chocolate and then adding unmelted "seed" chocolate to introduce the desired beta crystals.
Step-by-Step Instructions:
-
Melt: Finely chop the chocolate. Melt about two-thirds of your chocolate in a double boiler or microwave (in 30-second intervals, stirring in between to prevent burning) until it reaches a temperature of 115-120°F (46-49°C) for dark chocolate, 110-115°F (43-46°C) for milk chocolate, or 105-110°F (41-43°C) for white chocolate.
-
Cool: Remove the melted chocolate from the heat and add the remaining one-third of the finely chopped chocolate (the "seed").
-
Stir: Stir constantly until all the seed chocolate is melted and the mixture is smooth. This may take some time and patience.
-
Check Temperature: Monitor the temperature closely. The chocolate should cool to 88-90°F (31-32°C) for dark chocolate, 86-88°F (30-31°C) for milk chocolate, or 84-86°F (29-30°C) for white chocolate.
-
Warm (if needed): If the chocolate becomes too cool (below the working temperature), gently warm it back up to the correct temperature using a double boiler or microwave in very short bursts (5-10 seconds).
Common Mistakes:
- Overheating the chocolate during melting.
- Not adding enough seed chocolate.
- Not stirring continuously.
- Letting the chocolate get too cold.
Tips:
- Use a reliable thermometer.
- Chop the chocolate finely for even melting.
- Patience is key! Don't rush the process.
2. Tablier Method (Marble Slab Method)
The tablier method, also known as the marble slab method, is a classic technique that involves cooling the melted chocolate on a marble or granite slab.
Step-by-Step Instructions:
-
Melt: Melt all of the chocolate in a double boiler or microwave until it reaches the appropriate temperature (same as in the seeding method).
-
Pour: Pour about two-thirds of the melted chocolate onto a clean, dry marble or granite slab.
-
Cool and Spread: Use a spatula or scraper to spread the chocolate back and forth on the slab, continuously working it to cool it down. The goal is to create a thin layer of chocolate that cools evenly and encourages the formation of beta crystals.
-
Scrape and Combine: Once the chocolate begins to thicken and becomes slightly pasty (it should reach about 82-84°F (28-29°C) for dark chocolate), scrape it back into the bowl with the remaining melted chocolate.
-
Stir: Stir the mixture thoroughly to combine the cooled chocolate with the warm chocolate.
-
Check Temperature: The final temperature should be within the working range (same as in the seeding method).
Common Mistakes:
- The slab is not clean and dry.
- Not spreading the chocolate thinly enough.
- Letting the chocolate get too cold on the slab.
- Not scraping the chocolate back into the bowl properly.
Tips:
- A cool (but not cold) marble slab is ideal.
- Work quickly and efficiently.
- Use a good quality scraper.
3. Sous Vide Method
The sous vide method offers precise temperature control, making it a reliable option for tempering chocolate. This method requires a sous vide immersion circulator.
Step-by-Step Instructions:
-
Melt: Place the finely chopped chocolate in a zip-top bag or vacuum-sealed bag.
-
Sous Vide Bath: Submerge the bag in a water bath set to 115-120°F (46-49°C) for dark chocolate, 110-115°F (43-46°C) for milk chocolate, or 105-110°F (41-43°C) for white chocolate. Ensure the chocolate melts evenly. Massage the bag occasionally to distribute the heat.
-
Cool: Remove the bag from the water bath and lower the temperature to 88-90°F (31-32°C) for dark chocolate, 86-88°F (30-31°C) for milk chocolate, or 84-86°F (29-30°C) for white chocolate by adding ice to the water bath (or replacing the water with cooler water). Monitor the temperature closely.
-
Maintain Temperature: Once the chocolate reaches the working temperature, maintain it in the water bath. You can keep the chocolate tempered for an extended period using this method.
Common Mistakes:
- Bag not properly sealed, allowing water to enter.
- Inaccurate temperature readings.
- Overheating the chocolate initially.
Tips:
- Use a high-quality sous vide immersion circulator.
- Ensure the bag is completely submerged.
- This method is excellent for maintaining tempered chocolate for dipping or coating.
Troubleshooting: Bloom and Other Chocolate Woes
Even with careful tempering, problems can arise. Here's how to troubleshoot some common issues:
-
Bloom: Bloom refers to the white or grayish coating that can appear on chocolate. There are two types: fat bloom (caused by unstable fat crystals) and sugar bloom (caused by moisture). Fat bloom is usually a sign of improper tempering or temperature fluctuations during storage. Sugar bloom occurs when moisture condenses on the surface of the chocolate, dissolving the sugar and leaving a grainy residue when it evaporates.
- Solution: For fat bloom, you can try re-tempering the chocolate. For sugar bloom, the chocolate is generally still safe to eat, but the texture may be affected. Prevent both by storing chocolate in a cool, dry place at a consistent temperature.
-
Chocolate Seizes: Seizing happens when even a small amount of water gets into melted chocolate, causing it to become thick and grainy. This is because the water causes the cocoa solids to clump together.
- Solution: Sometimes, you can rescue seized chocolate by adding more liquid (a tablespoon at a time) and stirring vigorously. This can help to re-emulsify the chocolate. However, it's often best to start over with fresh chocolate, ensuring all utensils and surfaces are completely dry.
-
Chocolate is Too Thick: If your tempered chocolate is too thick to work with, it may have cooled down too much. Gently warm it back up to the correct working temperature using a double boiler or microwave in very short bursts.
Recipes to Showcase Your Tempered Chocolate
Now that you've mastered the art of tempering, it's time to put your skills to the test! Here are two simple recipes to showcase your perfectly tempered chocolate:
1. Classic Chocolate Ganache
Ganache is a versatile mixture of chocolate and cream, used as a filling, frosting, or glaze.
Ingredients:
- 8 ounces tempered chocolate, finely chopped
- 1/2 cup heavy cream
- 1 tablespoon butter (optional, for extra shine)
Instructions:
-
Heat the heavy cream in a saucepan until it just begins to simmer.
-
Pour the hot cream over the chopped chocolate in a heatproof bowl.
-
Let it sit for a minute to soften the chocolate.
-
Gently whisk the mixture together, starting from the center and working outwards, until smooth and glossy. If desired, whisk in the butter.
-
Use immediately or let it cool to your desired consistency.
2. Easy Chocolate Bark
Chocolate bark is a simple and customizable treat that's perfect for gifting or snacking.
Ingredients:
- 12 ounces tempered chocolate
- Your choice of toppings: nuts, dried fruit, pretzels, sprinkles, sea salt, etc.
Instructions:
-
Line a baking sheet with parchment paper.
-
Pour the tempered chocolate onto the prepared baking sheet and spread it into an even layer.
-
Sprinkle your desired toppings over the chocolate.
-
Let the bark set in the refrigerator until firm (about 30 minutes).
-
Break the bark into pieces and enjoy!
Conclusion
Tempering chocolate is a skill that takes practice, but the rewards are well worth the effort. By understanding the science behind it and mastering the techniques, you can create stunning chocolate confections with a professional-quality shine and snap. So, grab your chocolate, choose your method, and start experimenting. Happy tempering!