Ghee Whiz! A Simple Guide to Clarifying Butter at Home
Unlock richer flavor & higher smoke point: Master clarifying butter, ghee, & brown butter at home. Your guide to buttery perfection!
Ghee Whiz! A Simple Guide to Clarifying Butter at Home
Butter is a kitchen staple, but did you know you can elevate its flavor and functionality by clarifying it? Clarifying butter removes water and milk solids, resulting in a pure butterfat with a richer, nuttier taste and a significantly higher smoke point. This makes it ideal for high-heat cooking and adds a delightful depth to your dishes. Let's explore the simple process of clarifying butter at home, and delve into the delicious world of clarified butter, ghee, and brown butter.
What is Clarified Butter?
Clarified butter is simply butter that has been heated to remove its water and milk solids. Regular butter contains approximately 80% butterfat, 18% water, and 2% milk solids. When heated, these components separate. The water evaporates, and the milk solids rise to the surface or sink to the bottom of the pan.
By skimming off or straining out these solids, you're left with pure butterfat – clarified butter. This process not only enhances the flavor but also increases the smoke point, making it suitable for searing, sautéing, and frying at higher temperatures without burning.
Clarified Butter vs. Ghee vs. Brown Butter: What's the Difference?
While all three start with butter, the end results are distinct.
- Clarified Butter: As described above, it's butter with water and milk solids removed. It has a subtle, clean buttery flavor.
- Ghee: Ghee takes the clarification process a step further. It's simmered for a longer period, allowing the milk solids to caramelize and brown. This imparts a richer, nuttier, and more intense flavor than clarified butter. Ghee also has a longer shelf life.
- Brown Butter (Beurre Noisette): Brown butter involves cooking butter until the milk solids turn a deep golden brown, almost to the point of burning (but not quite!). This creates a complex, nutty, and incredibly fragrant sauce. It's not clarified in the traditional sense because the browned milk solids are integral to its flavor.
In short, clarified butter is pure butterfat; ghee is cooked clarified butter with caramelized milk solids; and brown butter is butter cooked to the point of browning the milk solids.
Why Clarify Butter?
There are several compelling reasons to clarify butter:
- Higher Smoke Point: Regular butter has a relatively low smoke point (around 302°F or 150°C). Clarified butter boasts a much higher smoke point (around 450°F or 232°C), making it ideal for high-heat cooking methods like searing and frying.
- Richer Flavor: Removing the milk solids concentrates the butterfat, resulting in a richer, more intense buttery flavor. Ghee takes this a step further with its nutty, caramelized notes.
- Lactose-Free: The milk solids, which contain lactose, are removed during the clarification process, making clarified butter and ghee suitable for individuals with lactose intolerance (though those with severe allergies should still exercise caution).
- Extended Shelf Life: Without water and milk solids, clarified butter and ghee are less prone to spoilage. Ghee, in particular, can be stored at room temperature for extended periods.
How to Clarify Butter: A Step-by-Step Guide
Here's a simple guide to clarifying butter at home:
Ingredients:
- 1 pound (4 sticks or 450g) unsalted butter
Equipment:
- Heavy-bottomed saucepan
- Heat-resistant spatula or spoon
- Fine-mesh sieve or cheesecloth-lined strainer
- Bowl or jar for storing the clarified butter
Instructions:
-
Melt the Butter: Cut the butter into cubes and place it in the saucepan. Melt the butter over low heat. It's crucial to use low heat to prevent scorching.
-
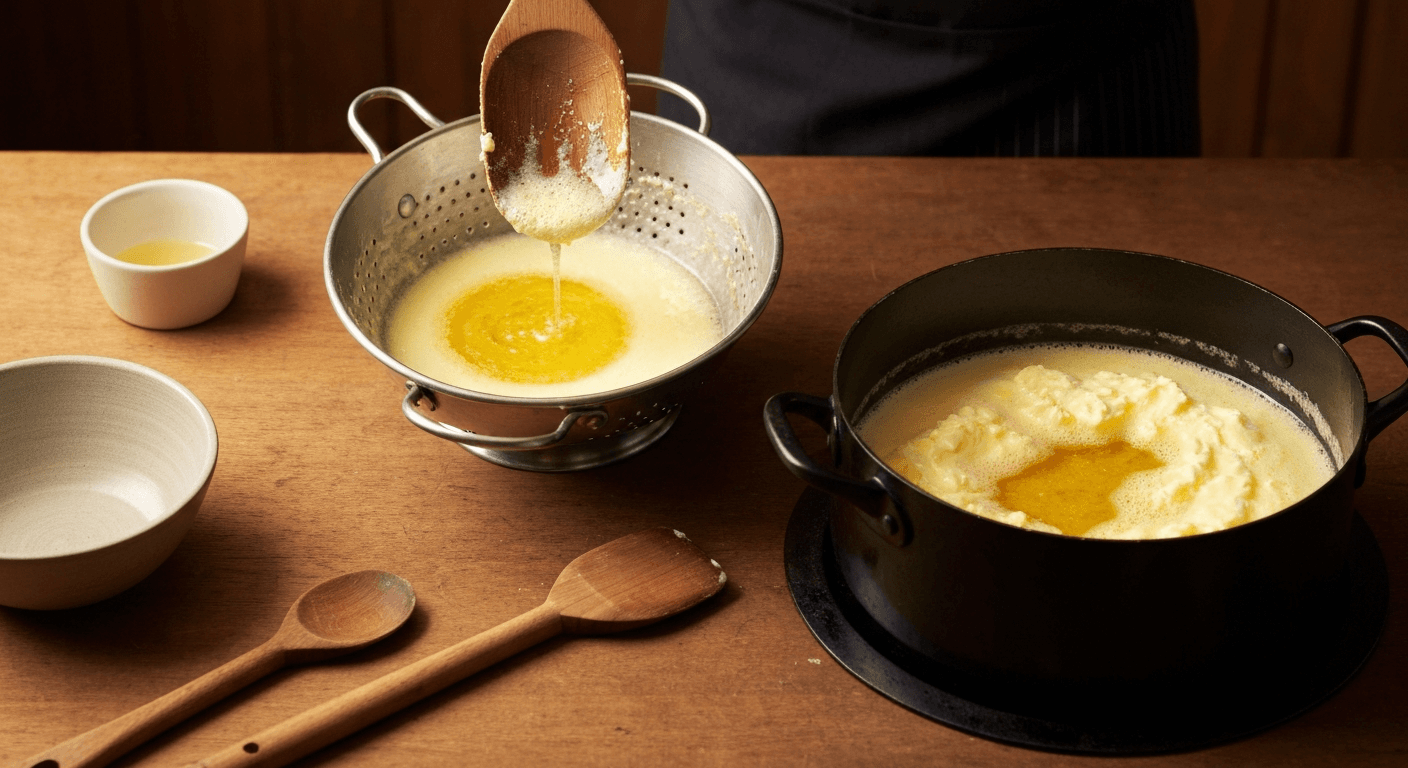
Simmer Gently: Once the butter is completely melted, reduce the heat to the lowest setting. Allow the butter to simmer gently, undisturbed, for 20-30 minutes. You'll notice the butter separating into three layers: foam on top (milk solids), clear butterfat in the middle, and milk solids at the bottom.
-
Skim the Foam (Optional): As the butter simmers, foam will rise to the surface. You can gently skim off this foam with a spoon. This step is optional for clarified butter but essential for making ghee, as it controls the level of caramelization.
-
Strain the Butter: Carefully pour the melted butter through a fine-mesh sieve or a cheesecloth-lined strainer into a clean bowl or jar. This will remove any remaining milk solids.
-
Discard the Solids: The solids collected in the sieve are the milk solids. Discard them.
-
Cool and Store: Allow the clarified butter to cool completely before storing it in an airtight container. It can be stored at room temperature for several weeks or in the refrigerator for months.
Making Ghee: Taking it to the Next Level
To make ghee, follow the same steps as clarifying butter, but with a few key differences:
-
Simmer for Longer: After the butter is melted, continue simmering it over low heat for a longer period, typically 30-45 minutes. The milk solids will sink to the bottom of the pan and begin to brown.
-
Monitor the Color: Keep a close eye on the color of the milk solids. You want them to turn a deep golden brown, but not burn. The browning process is what gives ghee its characteristic nutty flavor.
-
Smell the Aroma: The aroma will also change as the milk solids brown. You'll notice a rich, nutty fragrance.
-
Strain Carefully: Strain the ghee through a fine-mesh sieve or cheesecloth-lined strainer to remove the browned milk solids.
-
Cool and Store: Allow the ghee to cool completely before storing it in an airtight container. Ghee can be stored at room temperature for several months or in the refrigerator for even longer.
Tips for Perfect Clarified Butter and Ghee
- Use High-Quality Butter: The quality of your butter will directly impact the flavor of your clarified butter or ghee. Opt for unsalted butter from a reputable source.
- Use Low Heat: Patience is key! Clarifying butter and making ghee require low, gentle heat to prevent scorching.
- Don't Stir: Avoid stirring the butter while it's melting and simmering. This will help the milk solids separate more effectively.
- Skim Carefully: If you're making ghee, skim off any excess foam that forms on the surface. This will help control the level of caramelization.
- Strain Thoroughly: Ensure you strain the butter or ghee thoroughly to remove all milk solids. Even small amounts of solids can shorten the shelf life and affect the flavor.
- Store Properly: Store clarified butter and ghee in airtight containers in a cool, dark place. Ghee can be stored at room temperature, while clarified butter is best kept in the refrigerator for longer storage.
Common Mistakes to Avoid
- Using High Heat: This is the biggest mistake! High heat will cause the butter to burn and ruin the flavor.
- Stirring the Butter: Stirring disrupts the separation process and makes it harder to remove the milk solids.
- Not Skimming (for Ghee): Failing to skim off excess foam when making ghee can result in a less flavorful and slightly cloudy final product.
- Burning the Milk Solids: Over-browning the milk solids will result in a bitter, burnt flavor.
- Not Straining Properly: Leaving milk solids in the clarified butter or ghee will shorten its shelf life and affect the flavor.
How to Use Clarified Butter and Ghee
Clarified butter and ghee are incredibly versatile in the kitchen.
- High-Heat Cooking: Use them for searing steaks, sautéing vegetables, and frying eggs without worrying about burning.
- Baking: Substitute clarified butter for regular butter in baked goods for a richer flavor and flakier texture.
- Sauces: Use clarified butter as a base for sauces like hollandaise or béarnaise.
- Drizzling: Drizzle ghee over roasted vegetables, rice, or lentils for added flavor.
- Indian Cuisine: Ghee is a staple in Indian cooking and is used in a wide variety of dishes.
Beyond the Basics: Infused Ghee
Want to take your ghee to the next level? Try infusing it with herbs, spices, or aromatics!
Simply add your desired ingredients to the butter while it's simmering. Some popular infusions include:
- Garlic and Herbs: Add crushed garlic cloves and fresh herbs like rosemary, thyme, or sage.
- Chili and Spices: Add dried chili flakes, cumin seeds, coriander seeds, or turmeric.
- Vanilla Bean: Add a split vanilla bean for a sweet and aromatic ghee.
Strain the ghee as usual after infusing to remove the solids and aromatics.
Conclusion
Clarifying butter at home is a simple yet transformative technique that can elevate your cooking. Whether you're seeking a higher smoke point, a richer flavor, or a lactose-free alternative, clarified butter and ghee are excellent choices. So, grab some butter, a saucepan, and get ready to experience the magic of clarified butter! Your taste buds will thank you.